Showing posts with label altered art. Show all posts

Sunday, September 5, 2010

"Epic" Lunch Bag

Well, it's that time of year again, and this time around, DD13 finds herself needing a lunch bag. She and her dad were grocery shopping one day and purchased a bag of basmati rice -- a new love of hers, especially if it is accompanied by Indian food. They noted that the burlap rice bag could be transformed into an awesome lunch bag. Well, a tote bag is exactly what I envisioned when I saw the rice bag, too! So I asked if I might have the honours of creating the bag. I couldn't find any specific online tutorials, so today, I set to work just winging it  . . .

DD13 chose the fabric on the left because it reminded her of her MSN theme, and there was red to go with the red in the bag -- oh, and my observation -- pink to go with the colour in her hair ; -) So, we started with these:


I basically followed the same steps as I did for my journal tote bag, except that I wanted the lining to be wipeable. I considered using an old tablecloth for the lining, but the selection in our home was limited to ones that have already been recycled as art tablecloths, and are therefore covered in paint. But then I had the rather brilliant (if I do say so myself) idea of using self-sticking vinyl to protect the fabric on the inside of the bag! So, I took this, which I always have on hand from the dollar store:


. . . and just lay my piece of lining fabric face-down on it, then trimmed the excess vinyl:


Voila! I had vinyl covered fabric!


At this point, I was on a roll, so I decided I'd make a little pocket for the inside of the bag. I didn't want to pin it and make holes in the plastic, so I used some easy-to-see, decorative tape to keep it in place while I sewed (I didn't worry about finished edges on this pocket, since it had the vinyl to keep it neat, and it wouldn't be very visible anyway):


Pretty nifty, eh?


At this point, I should have sewed on the velcro that I wanted to use so the bag could be secured shut. However, I was so thrilled by how everything was working out that I forgot, and had to do it AFTER I had already sewed the lining together :{ It meant I had to crinkle the plastic a bit more than I would have liked, but it still worked : -)


The biggest challenge was attaching the lining to the rice bag -- the edges of the burlap were quite bulky, and I was afraid that when it was all atached there'd be all kinds of ugly bumps and gathers because of the way the two parts were NOT fitting together. However, it actually worked out pretty well! You'll notice that I added a pocket to the outside, just for fun, with some beads that I thought gave it a bit more of an Indian feel. What do you think?


This is the other side, where I secured the two original handles just as little dangly do-dads:


And here's a (blurry) peek inside the finished bag:


DD13 gave it the thumbs up and said it was an "EPIC lunchbag" : -)


While I was making her lunch bag, she was busy being creative herself. She didn't like the plain white dividers I gave her, so she took some scrapbooking paper and turned these:


Into these:


Pretty spiffy, don't you think? And the dear girl is putting the art tab first because that's her favourite subject! Ha! I love it!
Have you done anything creative in preparation of the new school year? Share about it in a comment!

I'm linking this post to:

The DIY Show Off

Tuesday, July 20, 2010

The Perfect Pair - Altered Art

Today is my husband's and my 19th wedding anniversary! In honour of that, I did a bit of altered art. Let's see if you can guess what I altered . . . (I'll give you a hint -- it's an advertisement for something.)

(Note: No money was spent in the creation of this card. That makes me frugal -- not cheap ;)


This is the cover. The title, "The Perfect Pair" was part of the original advertising. (I know it's "cheesy" -- ha!):

This is the inside spread:

The title "Create Your Own" was also part of the original advertisement ;)

An extra little flap that was originally a coupon, I think:

Space for me to write a personal note: (You didn't think I would share THAT did you?!;)

A close up of the title in case it helps you to guess:

Any guesses????

Unfortunately, I didn't take pictures of the original, but you can go here to see what type of advertising I used to create this one-of-a-kind (crazy?!?!?) anniversary card. If you think you know, leave a comment before you check the link.

Have you recycled anything that would otherwise be garbage into something useful and unique? Tell me about it in a comment:)


I linked this post to . . .

Visit thecsiproject.com

Friday, June 4, 2010

Joy Notes

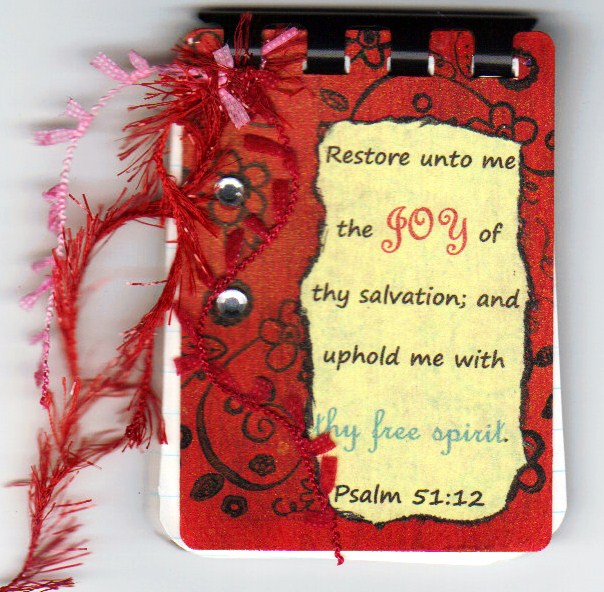
Inspired by Shona Cole of "The Artful Life" (author of The Artistic Mother), who was giving away a few of her own creations this past week, I used one of those blank playing cards I was rooting around for the other day to make this:

My dh asked me what it was for (I guess it IS kinda small!) --- but I had a good answer ready!

As I mentioned in another post, I've been noting the lack of joy in my life -- not because there's no source of it, but because I haven't been claiming it or practising it. I also mentioned that the theme for this month in the Creative Every Day challenge happens to be "bliss," and in the context of the challenge that word is used interchangeably with the word "joy." Also, yesterday I was absorbing some motherly encouragement at Sally Clarkson's blog, "I Take Joy" -- and then this morning I was reading Psalm 51 about joy being restored -- and I just knew I was meant to reflect on this theme pretty seriously.

Sooooo, I created this little notebook to document all the reasons I have to live a joyful life. That's what I want to live, and that's what I know I CAN live, but I have to choose it. As Sally Clarkson says, I have to "practise" it.

So I'm starting with this little notebook.

What about you? How do you practise living joyfully? Is there any creative, artful thing that helps you to do so?

Monday, May 31, 2010

Magnet Masterpieces

This morning as I rooted around in our homeschooling cupboard for some blank playing cards, I came across these old business magnets:

They begged to be altered, so this afternoon we created these:

We started by roughing up the surface with some sandpaper, then applying two coats of Liquidex Gesso, drying each with a hair dryer because, well, we're impatient artists. DD8 and her friend shared some paint (acrylic, for those of you who like to know) and half way through the project decided to sand off what they'd done and start again -- which accounts for a bit of a muddied background here on DD8's masterpiece (but I like the aged effect):


DD8 applied a sticker, and her friend (F6 we shall call her here :) chose to do a bit of stamping on top of the paint:

DS3 also applied some stickers to his thickly paint-mixed background. (I rather like the way the texture of his paint mimics the texture of the fridge! If you click on the picture, you might be able to see this better. But I suspect you might not care about THAT little detail ;)


I quite liked the yellow the girls chose, so I used a swatch of wallpaper that my cyber friend Daphne at Sew in Art kindly sent me in the mail (SNAIL mail -- I hardly ever get that any more! It was so delightful!) to stamp it on the gesso background. Then I applied my new little bird stamp and added a bit of bright blue with a Sharpie. (Can't seem to do a project without them!) I used rub-on letters for the "bliss" -- which is the theme for June in the Creative Every Day challenge. (Funny -- I'd been lamenting the absence of that in my life of late. I'm looking forward to reflecting more on it this month. I know it's there -- I just have to tap into it!) Finally, I added a paper flower (torn book pages inked and joined by a jeweled fastener) I'd made for another project. Oh -- and I went around the edge with the smushed nib of an old, black calligraphy marker to add some definition.

All of  our masterpieces were then swept over with a lick of decoupage glue to make them shiny and durable, and then dusted with a bit of fine glitter.


Kinda cute for some old magnets that have sat unused for years in the cupboard, don't you think?

Do you have any creative uses for old business magnets? (I still have lots to use up!)


Sunday, May 16, 2010

"Identity" Tag Book

Inspired by my cyber friend Daphne's work, I spent some time chillin' this week making some functional art out of . . . (drum roll, please!) . . . toilet paper tubes. We like to find creative ways to encourage our children to reflect on life, so I made this interactive book for my daughter during the wee hours of some nights I couldn't sleep anyway. Each little book/pocket has several tags on which she can finish the sentences, "I am . . ." -- "I have . . ." -- "I believe . . . " -- and "I will . . . ."


I decorated the backs of the pockets, too, as well as some of the tags.


Below is the rest of the double-tagged booklet above entitled "A Loving Family." Gotta love the GQ poses ;)


Have you found any creative uses for toilet paper tubes??????

More importantly, can you suggest some creative ways to get children reflecting about their lives?

I think I've said it before -- I'D LOVE TO HEAR YOUR IDEAS! :) Comment below, or email me at xinme2bcreative @ yahoo dot ca.

Thursday, May 6, 2010

Fun and Games

A while ago, someone in my Altered Books Yahoo Group posted some altered Dominos that she had stamped and covered with microbeads to make pendants. (I'm afraid I don't remember who it was -- there are so many awesome artists in the group!) That and a Google search inspired me to try it out myself. So, I guiltily broke up a set of double nines that we've had since BC ("before children," that is) -- after an unsuccessful posting of a request on Freecycle for an incomplete set, of course. (We have two other sets -- each slightly different -- so I didn't actually feel like I was depriving anyone of any fun!)

So, I started out with some of these:


With Podge-It glue, I applied some bits of a decorative paper napkin to several tiles, then glued on some micro beads and a bead with a decent sized hole to thread ribbon for a necklace. I liked the general effect, but was disappointed with the poor adherence of the microbeads.


Next, I tried a magazine cut-out and some scrapbooking paper with rub-on letters. For the one on the left, I used double-sided tape to adhere the microbeads -- but I don't think it was strong enough. I haven't found the perfect glue yet. Any suggestions?


I was having a lot of fun, but the microbeads were bugging me -- so I tried some with just decorative rub-ons. I quite like the effect :) I was thinking they could be used for gift tags and things like that. I turned the one on the left into a brooch by putting a pin on the back.


Easy-peasy!


Alas, I didn't have many appropriate rub-ons, so I turned to my current default art medium -- Sharpie markers:


I made the mistake of applying a clear coat thinking it would protect the markers -- but it made them bleed instead. Sigh. Live and learn, I guess.

Here are some others I did while listening to our science CDs and waiting for the children during their gym class:


Of course, creativity inspires creativity, so DD12 got in on the action:


Unfortunately, the clear coat ate away at the microbeads and double sided tape on hers (the one on the left), so I'm going to have to find another way for her to adhere the microbeads on it. But it still looks pretty :). She used a magazine cut-out and a vellum word for the one on the left and Sharpies for the one on the right.

I'm glad there's still a whole bunch of Domino tiles left to play with -- it's really rather addictive! It's not "Blow me away!" art work -- but it's "I could do that!" art. And that's exactly what I want you to say --

"I could do that!"

So do it -- and let me know how it goes! :)
Do you have any other ideas for ways to decorate and use altered game pieces?
Related Posts Plugin for WordPress, Blogger...